Croutons & Stuffing
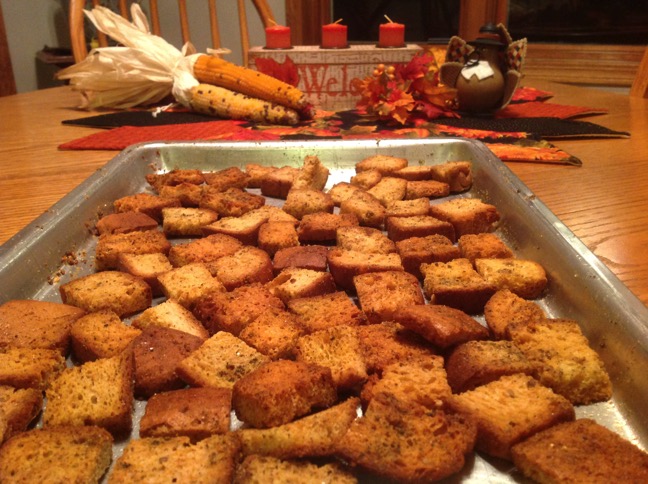
Gluten-Free Croutons
Special thanks to my Sister-In-Law Debi for showing Peggy how to make these for our Thanksgiving feast last year. They are great just for snacking on.
Ingredients:
1 to 1 ½ loaves of GF bread, cut or torn in desired size. For stuffing, pieces might be smaller vs larger for snacking/dipping.
GF Granulated Garlic
GF Granulated Onion
GF Ground Sage
GF Paprika (optional)
Salt
Olive Oil
Directions:
Preheat oven to 300.
Spread bread pieces on sided baking sheet. Allow to dry for at least 2 days – 3 to 4 is preferable.
Drizzle olive oil lightly over the bread and mix well.
Season to taste. Mix well after each seasoning.
Bake for 10 to 20 minutes or until GBDC (Golden, Brown, Delicious & Crunchy). Stir every 5 minutes.
Remove from oven and spread out to cool.
Note: Airbake pans won't brown as quickly. Try not to eat them all before you make your stuffing.
Tip: Instead of throwing out the heels or unused pieces of GF bread, put them in the freezer to be used later.
Gluten-Free Stuffing
Ingredients:
1 loaf gluten-free bread (or the croutons above)
3 tablespoons butter, unsalted
2 carrots, peeled and small diced
2 celery stalks, small diced
2 cloves garlic, minced
1 onion, peeled and small diced
1/2 teaspoon salt
1/4 teaspoon ground black pepper
2 cups gluten-free chicken broth
1 1/2 tablespoon fresh sage, chopped
1 tablespoon fresh thyme, chopped
Directions:
Preheat oven to 325°F. Slice the bread into 1-inch cubes and spread out on a baking sheet.
Place in the oven and toast for 25 minutes, flipping/tossing once during toasting. (Skip this step If you are using the croutons you made from above recipe)
Melt butter in a large and deep cast iron or oven-safe skillet. If you do not have a large and deep oven proof skillet, you can prep the stuffing in a skillet and transfer to a 9" x 13" baking dish before finishing off in the oven. To the butter, add carrots, celery, garlic, onion, salt, and pepper. Sauté on medium heat for 15 minutes until the onions and carrots are soft and tender. If the onions or garlic start to brown, reduce heat to medium-low.
Once the carrots are tender, add chicken broth, sage, and thyme and stir to combine. Simmer for 5 minutes. Taste, and add additional salt or pepper, if needed. Next, add the toasted bread cubes/croutons and gently toss to combine. Transfer to the oven and bake for 25 minutes. Serve warm. Makes 6-8 servings.
Tomato Soup
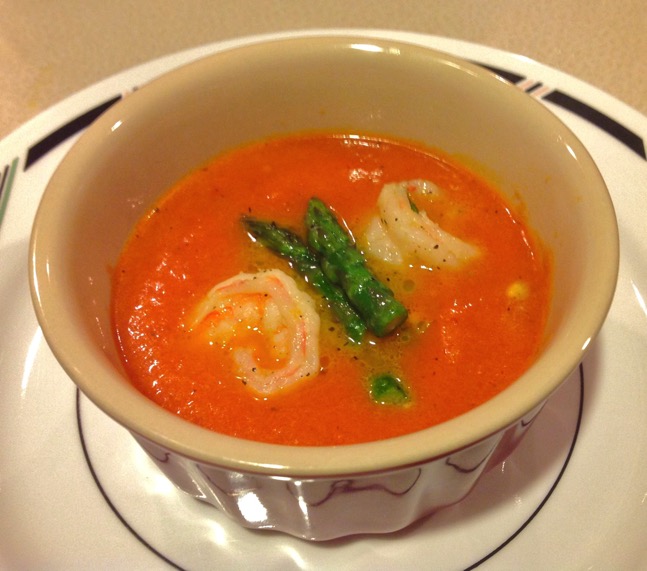
Gluten-Free Tomato Soup
Peggy came home from work and was hungry tomato soup and grilled cheese sandwiches. However, there was a small snag in this plan; we didn't have any tomato soup.
As many of you know, most tomato soup is not gluten-free. Since I'm not a huge fan of tomato soup, this fact was not a hardship for me when I went gluten-free.
It was late and neither one of us wanted to run down to the store to get a can. I said, "It is tomato soup, it can't be that difficult to make, I'll just make some [gluten-free of course]".
So I hop on the iPad and Peg grabs her laptop. In few minutes we a have few recipes that are quick and easy [and good and gluten-free!]. While I worked on the soup, Peg made the grilled cheese sandwiches. We make a great team!
Ingredients:
1 tablespoon olive oil
1 tablespoon butter
1 medium white onion, coarsely chopped
2 cans diced tomatoes [with juice]
1 1/2 cups gluten-free chicken broth or water (Kitchen Basics, Swanson’s, Pacific, Imagine)
2 Bay leaves
1/3 cup skim milk (we didn't have any heavy cream)
Salt & fresh ground pepper
Directions:
Place medium sized pot [enough to hold all the ingredients] on medium heat. Add butter and olive oil. Add onion, season with salt and freshly ground black pepper. Sauté until onion is soft and just start to caramelize [about 10 - 15 minutes].
Add tomatoes and juice to the pan and stir to crush dices of tomatoes. Add the broth [or water] and bay leaves and bring to a simmer. Simmer until tomatoes pieces begin to break down, about 10 minutes.
Remove from heat, remove bay leaves, and allow soup to cool slightly. Carefully spoon some of the soup in blender/food processor [you may have to do this in batches]. Blend until smooth. Return soup to the stove over low heat and stir in cream.
Taste for seasoning adjustments.
Even though I'm not a fan of tomato soup, I have to say, I did like it and will make this again.
If you're looking for a kicked up grilled cheese sandwich, check out our Pesto Tomato Grilled Cheese Sandwich.
Sauteed shrimp and steamed asparagus garnish the soup.
Until the next good eats - cook well and be well.
Al
Seasoned Vegetable Medley with Shrimp
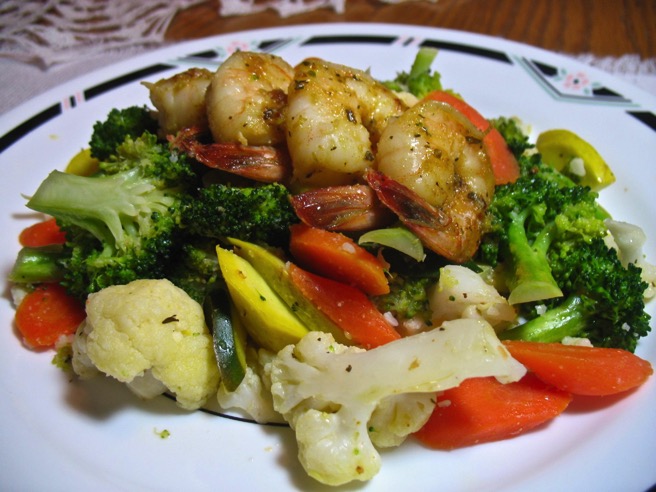
Seasoned Vegetable Medley with Sauteed Shrimp
This veggie dish has become a favorite in our house. I make a large batch so I can have left overs. I like to make an omelet with these veggies.
This dish is all about timing. You don't want the shrimp to get done first and get cold. You don't want to leave the veggies in the pan waiting for the shrimp to get done.
The veggies will cook at different rates; you can help adjust for that by paying attention to piece size. Cauliflower and carrots tends to take longer to cook due to their density. I like to have a bit larger pieces of cauliflower, so those go in first. I try to keep the carrot slices about 1/4" thick. Broccoli, squash, and zucchini cook pretty quickly - keep a close eye on them so they don't turn to mush.
I tend to like my veggies on the crunchy side, so adjust the cooking times to suit your tastes.
Veggie Ingredients:
Cauliflower
Carrots
Broccoli
Yellow Squash
Zucchini
1/2 lemon - quartered
Grass Fed Butter
Olive Oil
Granulated garlic (Penzey's)
Granulated onion (Penzey's)
Tuscan Sunset (Penzey's)
Salt
Fresh ground pepper
Shrimp Ingredients:
1 lb raw, peeled, devained, and cleaned shrimp
Olive Oil
Granulated garlic (Penzey's)
Granulated onion (Penzey's)
Forward (Penzey's) Adds a bit of heat and spice
Salt & fresh ground pepper
Directions:
Place shrimp on a plate.
Season shrimp with garlic, onion, Foward, salt & pepper. Drizzle with olive oil. Mix well.
Set aside while working on the veggies
Cut veggies into bite sized pieces. Place large saute pan on medium high heat.
Add olive oil to pan. Add cauliflower. Stir.
Squeeze lemon pieces over cauliflower and add lemon pieces in the pan.
Add splashes of water to create steam. When water has evaporated, add a bit more. Do this through out the entire cooking process.
Lightly season with granulated garlic, onion, Tuscan Sunset, salt and pepper.
Stir. Allow cauliflower to saute/steam for about 2 - 3 minutes.
Heat another saute pan for shrimp.
Add carrots - lightly season - stir - add a bit more water - stir for 3 - 4 minutes.
Add a bit of olive oil and shrimp to other saute pan. Stir.
Add broccoli - lightly season - stir - add a bit more water - stir for 1 - 2 minutes.
Stir shrimp
Add squash and zucchini - lightly season - stir - add a bit more water - stir for 1 - 2 minutes.
Remove shrimp pan from heat. Shrimp should be pink.
Add 2 to 3 tablespoons of butter to veggies. Stir while melting.
Taste and add additional seasoning if needed.
Remove the lemon pieces.
Plate the veggies, top with shrimp.
Until the next good eats - cook well and be well.
Al
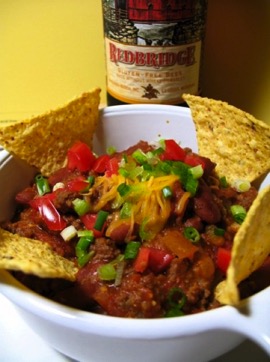
Chili Con Carne
This is the style of chili that I grew up on. Rarely did we have the "soup-like with pasta" type chili. Peg prefers the "soup-like" chili so she uses my chili as a "concentrate" to create her type [see below]
My mom and I would take a spoonful of chili and place it on top of a Saltine. This is how I learned how to eat chili. It was nothing for me go thru at least an entire sleeve of crackers this way. I shudder at thought of this now. Good grief...
Also, as a kid, I picked out the beans because I didn't like them. Now I like them, but Peg picks them out for "preventative measures". Funny how things change...
Chili Con Carne
Ingredients:
1 lb ground beef
2 cans of diced tomatoes (use fresh if you have 'em)
or 1 jar of Newman's Mild Salsa
1 diced medium onion
2 stalks diced celery
1 diced bell pepper (pick your favorite color or colors)
1 can of kidney beans (I prefer Joan of Arc)
1 - 2 teaspoons Penzey's Chili Con Carne spice blend (start small, you can always add if needed)
1 - 2 teaspoons gluten-free Worcestershire sauce
(Lea & Perrins brand is gluten-free, many brands are not)
Salt to taste
V8 or tomato juice
GF Beer (optional)
A few ounces of shredded cheese (garnish)
1 - 2 Green onions (garnish)
1 fresh diced tomato (garnish)
Directions:
Add peppers, celery and onions to pan, add pinch of salt and Penzey's Chili Con Carne spice mix
Saute' until slightly soft.
Add ground beef and brown on med-high heat. Remove any excess grease.
Drain and add beans - stir
Add canned tomatoes or salsa - stir
Add 1 - 2 cups of liquid (V8/Tomato Juice/GF Beer) - stir
Add Worcestershire sauce - stir
Allow chili to come to a good bubble and reduce heat to simmer.
Stir occasionally.
Salt & season to taste
Simmer for 10 - 15 minutes. If chili becomes too thick - add more liquid of choice.
Options:
Soup-like Chili with Pasta Note: Gluten pasta requires you to be be mindful of cross contamination risks.
Make your favorite pasta and set aside.
Place several scoops of Chili Con Carne into a larger pan on low heat
Add 16 - 24 oz of V8/Tomato Juice
Add cooked pasta
Simmer until heated
Salt & season to taste
You might need to re-season this chili depending on how hot you like it. I tend to like my chili spicier than Peg, so when she adds the liquid and the pasta - it's about right for her tastes.
Notes:
If you are using canned tomatoes, they are going to be sweeter and less spicy than salsa. You'll need to adjust amount of chili seasoning depending on the tomato product used. Taste as you go...
Until the next good eats...
Al